1 Understand key issues relating to the preparation of image output.
1.1 Explain the principles of colour theory, colour mode and colour management

Refer to Unit 35, 1.1 for more information.
Colour theory
Colour theory is a term used in which to describe the collection of rules and guidelines regarding the use of colour, especially in art, design, photography and more creative jobs. It is a set of principles which are used in which to create harmonious colour combinations, which is known as colour theory. It’s about how and why some colours work well together to please the eye, while others don’t. Colour theory is built up of multiple components such as the colour wheel, colour harmonies and colour context.
The colour wheel
A colour wheel, is simply a circle created to show different coloured sections used to show the relationships between different colours. It is well known that every colour created and produced can all be traced back to three basic colours which are named the primary colours. Three colours are known as primary colours, and can also not be made by mixing any other colours together to produce them, which are red, yellow and blue.

So above we have three primary colours, which can be mixed together to produce secondary colours. As shown on the diagram at the very top and below, red and yellow can be mixed together to produce orange; yellow and blue mixed together produces green; and red and blue mixed together makes purple.

The third step is combining primary and secondary colours to produce tertiary colours. Blue and green produce teal; green and yellow make chartreuse; yellow and orange become amber; orange and red become bermillion; red and purple make magenta; and finally purple and blue produce violet.

Colour harmonies

Complementary
Complementary colours are the ones opposite each other on the colour wheel. For example, red and green. As complementary colours are on the opposite side of the wheel to each other, this means they have a high contrast level when put together, as they create a vibrant appearance, making things stand out when used.
Analogous
Analogous colour schemes use colours that are next to each other on the colour wheel, like above. These colours match well as they’re similar in shade also. It’s important to choose one colour to dominate, a second to support alongside a third colour as an accent.
Triad
Using colours that are evenly spaces around the colour wheel, is known as a triadic colour scheme. They tend to be vibrant and full of saturation. To use this scheme successfully, the colours should be carefully balanced, letting one colour dominate and the other two for accent.
Split complementary
This colour scheme includes a variation of the complementary colour scheme which I explained above. It uses a base colour, alongside two colours adjacent to it’s complement. Theres a strong visual contrast with this colour scheme.
Rectangular
Four colours arranged into two complementary pairs are used for this colour scheme. A big tip when choosing this scheme is to pay attention to warm and cool colours, making a balance of the two temperatures.
Square
The final colour scheme is very similar to the rectangular scheme by using the same amount of colours, but all four are separated evenly around the wheel. This scheme also works best when one colour dominates.
Temperature

The colour wheel can be divided into half, with warm colours on one side and cool on the other. We call it temperature, as one side includes warm colours and the other including colder colours. The diagram on the right shows the temperature split.
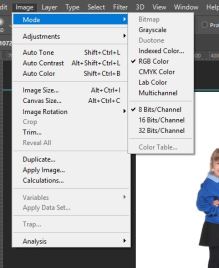
Colour mode
A colour mode can be changed which alters the way an image editing software programme such as photoshop saves the colour information. Below are a list of all the colour modes, as well as an image to show them all together.

Different color modes:
- RGB mode (millions of colors)
- CMYK mode (four-printed colors)
- Index mode (256 colors)
- Grayscale mode (256 grays)
- Bitmap mode (2 colors)
Colour management
CMS is short for a colour management system, which is a collection of software tools which are used to ensure colours remain the same on all devices and displaying equipment. Colours are dependent on devices and now that different devices use different technologies to produce colours, consistency in colour can be a challenge to maintain.
Bibliography
https://study.com/academy/lesson/what-is-a-color-wheel-definition-types.
htmlhttp://www.tigercolor.com/color-lab/color-theory/color-theory-intro.
htmhttps://helpx.adobe.com/photoshop/using/color-modes.
htmlhttps://www.techopedia.com/definition/478/color-management-system-cms
1.2 Explain how and why image profiles are used
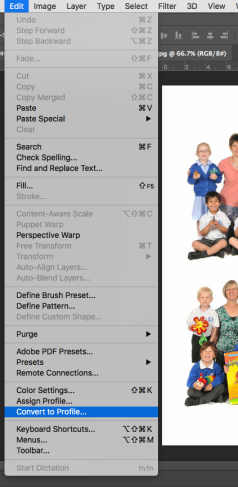
Image profiles are used to achieve consistent colours through different mediums. For example it is important to make sure the colour profile of the document you’re working on is the best one for the medium you are using. Image profiles control the correct display of your chosen image on multiple devices and programmes. Images from the internet use RGB colour mode, which makes it important to use the same colour mode in Photoshop when editing images; this prevents the image from looking washed out when viewed on the internet. All the different colour mode proofs are viewable in Photoshop found under ‘view’. Below shows an example of the same image under different colour modes.
RGB colour mode

CMYK colour mode

As you can see above, the RGB colour mode is more vibrant than the CMYK colour mode, making the CMYK look washed out and not as sharp. It has a hazed appearance. At Yep we always work on RGB colour mode. The convert to profile tool gives full control over colour conversions.
Bibliography
1.3 Identify relevant sources of information to assist with keeping own knowledge and skills up-to date

Now that Chantal as moved out of the Lab for maternity leave, it’s just myself and a trainee in the Lab department. This means I have taken over the role of work flow and training the trainee up on the rest of the things she doesn’t yet know in the Lab. If there is anything I am not sure about, the first place I go is to the training manual Chantal created. This doesn’t include everything but it includes some of the bigger/harder things to do/run. If what I’m looking for doesn’t appear in the training manual, I speak to Bryan who is a graphic designer, and was the first person to set up everything in the Lab when it first started.
For learning in Photoshop and Lightroom, I go to the senior photographer to build my skills up. He has a very advanced knowledge from previous courses. There is also someone on youtube called ‘tutvid’ who creates amazing photoshop tutorials. I have learnt many skills off this youtube account which have helped me progress my skills and knowledge. I have been able to show these skills to my other colleagues.
Bibliography
https://www.youtube.com/user/tutvid
1.4 Explain the importance of having accurate technical and descriptive metadata

Please refer to Unit 35, 1.4.
Metadata definition
“Metadata is data that describes other data. Meta is a prefix that in most information technology usages means “an underlying definition or description.”
Metadata characterizes data and is used to provide documentation. There are many types of metadata such as descriptive, structural, administrative, reference and statistical. It describes data which contains specific information such as type, length, textual and more.
Whats the purpose of metadata?
A range of metadata can be contained in all image file formats such as JPEG, TIFF, PSD and others. Image files contain metadata which provides information about each specific image. Below is a list of information each image holds.
- The file name
- The file format
- Dimensions of the images
- Resolution
- Colour depth
- Times and dates for the image when last updated
- Camera settings for when the original image was taken
Below I have attached a screenshot image as an example of the information images hold that we have come in.
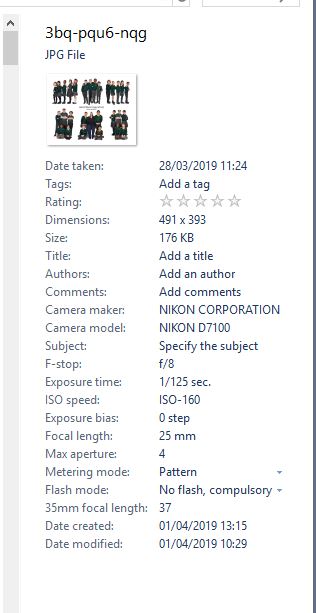
Technical Metadata
Technical metadata describes information about technology. Information such as database ownership, physical characteristics of database, performance tuning and more. It is automatically generated by the camera. Camera settings such as aperture, shutter speed, ISO number, focal depth and more. It is important that technical metadata is accurate because the metadata is required for identification and copyright protection. We use this finding digital images by searching on the system and for tracking purposes.
Descriptive Metadata
This type of metadata describes a resource for purposes such as discovery and identification. Information about the visual content, and is used to find, identify and understand images. It includes elements such as headline, title, captions as well as keywords. This also is used for searching image files.
Bibliography
https://whatis.techtarget.com/definition/metadata
https://en.wikipedia.org/wiki/Metadata
http://marciazeng.slis.kent.edu/metadatabasics/types.htm
Bibliography
1.5 Identify the relative merits of appropriate equipment, software, methods and material for different imaging requirements
Please refer to Unit 35, 1.5 for more detail on the relative software.
Below I am going to be identifying the relative merits of appropriate equipment, software, methods and material for different imaging requirements.
The two main software programmes I use as an editor, are Adobe Photoshop and Adobe Lightroom. I also use bridge when producing squares.
Adobe Photoshop

Adobe Photoshop is a graphics designing application and an image editing software which has been developed and manufactured by Adobe systems, allowing you to manipulate, crop, resize, colour correct and edit even further on a digital image. In the Lab department, we use Photoshop everyday. As editors, we use photoshop to crop images, swap heads when there’s group photos, make our square shots and more. On every shoot that comes in, photoshop is used.
Adobe Photoshop is an extremely popular software programme used by many people in the creative industry. There are many pros known for this programme such as Multitude of photo correction , manipulation tools and 3D capability.

Lightroom was also developed and manufactured by Adobe Systems, allowing you to import, view, organise, tag and edit digital images. We import all the images from the photographers into a folder on Lightroom, then start by selecting the images we want to use. For example, on individual shoots, there are normally 3 photos for each child, we flag out the ones we don’t want leaving us with the best image for that child. For our squares shots, we also pic one image which all children are looking and smiling in, sometimes we have to export more than one for the cluster if we have to swap heads for a child. With MPG shoots, we colour correct all images and do not pick one for each class. We export them all and then select all images for one class, import them into photoshop and then swap heads because there are roughly between 20-40 children in a class. Next is to colour correct our images, which we use a colour board for that the photographers take for us to white balance the skin tone.
Adobe Bridge
:max_bytes(150000):strip_icc()/Image_01-58a4ab1f5f9b58819cf0df75.jpg)
I only use Adobe Bridge when doing square shots. It is only used to select all the clusters we need for each class, and then open them in photoshop. Using Bridge allows us to open all the clusters on the same page in Photoshop instead of importing them all on to separate pages then having to copy them all onto one.
Printers
Below is an image of the wet lab printer we use in the lab department to print orders. This uses light sensitive paper and we chemicals to produce the images we send to schools and parents. This printer needs a lot of care taken to it such as topping it up with water that has been filtered to take away limescale, it needs the chemical waste emptied throughout the day also, multiple calibrations when constantly printing throughout the day, and more.

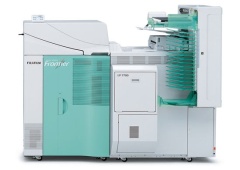
Below is an image of the Ricoh printer we use to print proofs on, online orders, use as a scanner to scan orders in so they appear on the system if any parents or school rings up, and print brochures off.

Bibliography
http://www.businessdictionary.com/definition/Photoshop.html
https://en.wikipedia.org/wiki/Adobe_Lightroom
https://en.wikipedia.org/wiki/Adobe_Bridge
Bibliography
1.6 Explain the reasons for using different file formats for digital images, identifying the differences between them

Please refer to Unit 35, 1.2 & 1.6 for more information on file formats.
It is important to select the appropriate file format that is most suitable for what you wish to use it for.
The difference between Vector and Raster
Vector Image Files– These images are more flexible and are constructed using proportional formulas rather than pixels. File formats such as EPS, AI and PDF are best for creating graphics that require resizing.
Raster Image Files– A series of pixels or individual blocks are constructed to form an image, which are called raster images. Examples of raster image extensions are JPEG, GIF and PNG’s.
JPEG

JPEG stands for Joint Photographic Experts Group, and is the most popular image file format used. They’re commonly known for their ‘lossy’ compression, meaning the quality of the images decreases as the file size decreases. JPEG’s are normally applied for the processing and storage of full colour images.
Advantages of JPEG image format
- This format is extremely portable.
- Compatible with many hardware devices such as printers, making it easy to print JPEG files.
- JPEG’s can be used to store high-resolution fast-moving images.
- Able to be stored quickly from a camera storage device.
- The sizing can be easily reduced and compressed, making it suitable for transferring images over the web.
Disadvantages of JPEG images format
- Compression technique is a ‘lossy’ compression.
- Reduced quality of image.
- Can’t support layered images.
PNG

A PNG image format stands for Portable Network Graphics and is a file format to compress images. With a PNG format, you can control the degree of transparency/opacity. They’re the perfect image format for interactive documents (for example: web pages). Although they’re a low resolution file format, they’re known as ‘lossless’ meaning you can edit them without losing the quality.
Advantages of PNG image format
- The quality isn’t lost when compressed.
- Format is suitable for storage of intermediate versions of the image.
- This file format supports a large number of colours.
- Possible to work with layers.
Disadvantages of PNG image format
- Doesn’t support animation.
- Unable to store multiple images in one file.
GIFF

GIFF (Graphic Interchange Format) storing files of colour graphics, a standard compressed file format used for pictures. This file format allows you to use a series of separated frames (images) together which creates a type of animation. These are used for things such as banner ads.
Advantages of GIFF image format
- GIFF file size is small.
- No additional software is required in order to view.
- Images don’t lose quality when compressed.
Disadvantages of GIFF image format
- Oldest image format.
- Larger file size than PNG format.
TIFF
TIFF stands for Tag Image File Format, developed in 1986 and is a very common format for exchanging raster graphics images to and from application programmes.
Advantages of TIFF image format
- No data is lost due to the format not be compressed, quality isn’t decreased.
- High quality images.
Disadvantages of TIFF image format
- Sizing of image isn’t compatible with the web.
- Due to the file size being large, sending this file format through email proves difficult.

Portable Document Format, commonly known as a PDF, is a file format which captures all elements of a printed document. This file format is most commonly used for documents such as magazine articles, product brochures and flyers. PDF is associated with “paperless office” and commonly used for printing and designing.
Advantages of PDF image format
- A PDF file format can be opened on any device.
- This file format takes up only a small amount of space on your hard drive.
Disadvantages of PDF image format
- PDF files can only be edited in specialised programmes.
- Text in PDF files are perceived as a picture, which means it’s more difficult to work with.
AI

AI (Adobe Illustrator), is a file format which is developed by Adobe Systems. This programme is a vector graphics editor, mainly used for creating company logos, for any promotional usage and print media.
Advantages of AI
- It’s scalable.
- Creates files in manageable sizes.
- Can create print and web graphics.
Disadvantages of AI
- Limited support for raster graphics.
- Requires space.
Bibliography
https://blog.hubspot.com/insiders/different-types-of-image-files
https://bytescout.com/blog/2014/06/pros-and-cons-of-jpeg-image-compression.html
https://searchmicroservices.techtarget.com/definition/PNG-Portable-Network-Graphics
https://www.thefreedictionary.com/Giff
Animated GIFs (Graphic Interchange Format) advantages & disadvantages
http://www.graphicrating.com/2009/05/01/gif-jpg-and-png-file-formats-pros-and-cons/
https://www.bitpipe.com/tlist/Tag-Image-File-Format.html
https://whatis.techtarget.com/definition/Portable-Document-Format-PDF
Bibliography
2 Be able to prepare image output for screen use
2.1 Check that the image files are in the correct format and carry an embedded profile for the required form of output

There are multiple file formats which I have written about previously, refer to Unit 35 for more details about the different file formats.
- JPEG (or JPG) – Joint Photographic Experts Group
- PNG – Portable Network Graphics
- GIF – Graphics Interchange Format
- TIFF – Tagged Image File
- PSD – Photoshop Document
- PDF – Portable Document Format
- EPS – Encapsulated Postscript
- AI – Adobe Illustrator Document
- INDD – Adobe Indesign Document
- RAW – Raw Image Formats
At Yep, as well as editing and creating images for schools and parents, I also create images for our social media Instagram site. This means when saving my images, they need to be of a small file size in order to be sent over to the manager and placed on Instagram. I always save as a JPEG file for images that go on social media, and also get sent to the printer.

2.2 Load the image data files for output on to the computer

At Yep, we have multiple network’s in which we have different files saved to. We have a very organised system when it comes down to school images. We have separate folders for ‘spring-summer’ and ‘autumn-winter’ for each year, with all schools having their own 4 digit number. This makes it easy to locate images and have everything saved in the same place. We also have our own programme called yep import, which enables us to store all our information on it, and search for images. It is important for me to save my images as 2 different file types, PSD and JPEG files to ensure the PSD file can be edited if changes need to be made.
2.3 Optimise files for the specified output

Our photographers take outside MPG images of class and whole school or year groups. These come in as RAW files. therefore I have to amend these in Adobe Photoshop to ensure they are compatible for the printer. Once I have edited these images in Lightroom and Photoshop, I then select file, save and save as a PSD file and JPEG in two separate folders to ensure everything is clear.
2.4 Select an appropriate medium for storing the image output files & 2.5 Check that the output format meets the client’s requirements
What are your client’s requirements?


Before editing, I always check the job sheet that has been confirmed by the general manager on the confirmation call to the school. Some schools ask for different size comp copies ect, meaning I have to make sure I keep the original, one that has been edited without being cropped, and a cropped version. I always make sure I keep the original files as well as saving them as PSD and JPEG files once edited. It is important I keep all original files and not work over them as this is a very destructive way to work. I can then go back to the original images if anything went wrong when editing or anything got deleted. When we have Caps taken, they’re images of the school children doing activities. Schools normally want these images taken for their website or to put up around the school. Most the time, we send a contact sheet made in Lightroom, with all images on, for the school to pick their set amount of images they pay for. When the chosen images come back, I then edit them in Lightroom & Photoshop. It is important for me to keep these original files in case the school do not like the editing or change their mind on the images they would like.
2.6 Store the files on the digital medium so that they can be accessed by the client


Dropbox is used everyday by Yep. After photographers have shot the schools, they upload all their images onto their own folder on our dropbox account, which allows anyone in the office to access the files. Apart from dropbox, all our files/images are saved on our devices in organised folders.
This section doesn’t relate directly to our company as we don’t store files for clients, apart from when ordering USB memory sticks. We have a pack option which is the image on a USB stick, which gets sent back to the school/parent.
2.7 Set up the output devise and file to be used

Our photographers use dropbox to copy their images to so the office is able to access them quickly. This also allows us to keep a copy of the original work. When we have sent the proof cards out to the schools, they get handed to the parents with all pack options on/ and online. We have one pack option which is a USB memory stick. This pack option includes an image on a USB stick, which gets sent back to the school/parent.
2.8 Check that the output medium is of sufficient capacity
To ensure there is maximum capacity on Dropbox before the photographers start uploading their work, we will select the folders we no longer need from previous terms and years, and save them on a hard drive elsewhere. This makes sure there’s enough space for the photos to be uploaded making it easier for the photographers when they’ve been out all day or get back after the office shuts. Sometimes the photographers hand their work in which we keep elsewhere on another network.
It is important we keep an eye on how much space we have left on each PC and all the networks and servers.
When sending any images over email to the general manager or other colleagues, I have to make sure I duplicate the file and create it as a low res. This makes the file size smaller and enables it to be sent via email without being bounced back.
As we have order packs for a USB stick, it is important we only put 1 image on each USB. This is because they won’t hold an image with a big file size.
3 Be able to prepare image output for print
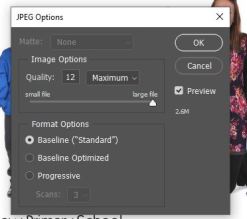
3.1 Check that the image files are in the correct format and carry an embedded profile for the required form of output
When creating images for print, it is important they’re saved as a JPEG file format. This is a compressed graphic format and supports up to 24-bit colour, compressed using lossy compressions. We can’t print on the wet lab from any other file format. I make sure the correct colour mode is set which is RGB for our company’s work, and that the image is saved as the highest JPEG quality. Below are screenshots.
Bibliography
3.2 Load the image data files for output on to the computer
When saving my work, it is incredibly important for me to keep everything organised and save. i have multiple folders with the schools name on and their own individual 4 digit number we give them. This makes all work easy to find and keeps everything safe if a parent rings up at a later date. All final images are placed on a network named ‘image server-nas’ which everyone in the office has access to. This is important due to reception needing to be able to search for images when parents ring them up. They also have access to our own programme ‘yep-import’ which has all data on including dates in which orders were sent back to the school. We also keep all original shoots so we can easily revert back to the original file if need be. Parents also call and email in requesting to see alternative images of their child so they can see if they’d prefer any of the other images taken. This means we need to search back in the original files to find all images taken for this child.
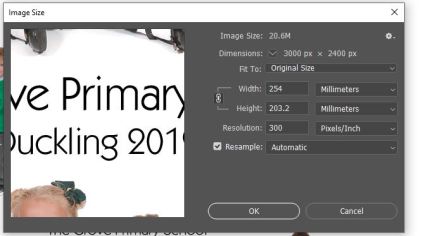
3.3 Optimise files for the specified output
![]()
Once we have edited all work from one shoot, it gets checked and signed off. This allows me to start the processing which I use yep-import for. Processing our work through this programme puts all data onto the system, all images get their own individual reference number, and renders the proof cards. It also allows us to upload the images online for parents to view and order, as well as making CD’s which go back to the school so they have all images for their system. When uploading online, we make sure the images are JPEG’s. When photoshopping, we make sure all images are saved as 240DPI or 300DPI (only for certain products).
3.4 Check that the capacity of the print medium is sufficient

Before printing, it is important for me to check there is enough paper and it is the correct sizing. I have two printers in the Lab that I use and look after, with both completely different systems. For the Ricoh printer, I only use A4 size paper which is inserted in one draw. This is what I print proofs from. The wet lab printer is very different, and using light sensitive paper. The two default sizes are 5 inch and 8 inch. These are the most used sizes, however we also use 6 inch and 12 inch. It is important I either have enough paper in before printing, or have another cassette loaded with the sized paper I am low on, to make sure it’s a quick change over and the new role can be placed in the printer. I then have to calibrate the new paper. I also have to fill the wet lab printer up with water, and drain the waste chemicals as the printer is being used throughout the day.
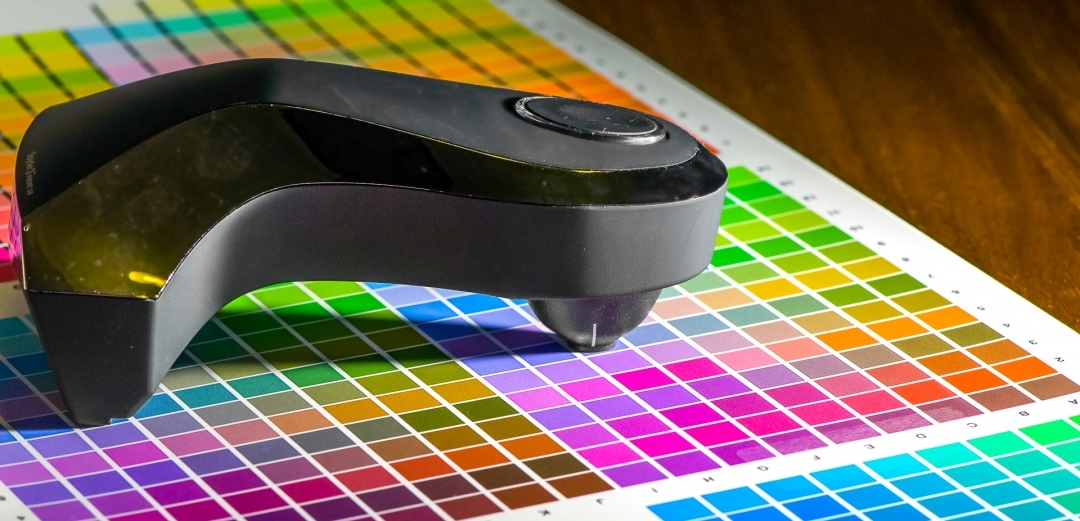
3.5 Check that the output device is properly calibrated for the medium to be used

Ricoh Calibration
This Ricoh printer doesn’t need calibrating as often as the wet lab printer. To calibrate this machine, I load up Fiery on my computer, which is linked to the printer. I click on the option ‘calibrate’ and follow the instructions. First it prints out a colour sheet like the one above, then I use the small machine in the picture above, connect it to my computer via the USB cable. There are circles each side of the colour strips, which are your starting and end points. Set the machine to the first dot, hold down the buttons on the side till you get to the end dot along the colour strip. Once all colour strips give off a green light via the machine, the calibration is successful and completed.
Wet Lab Calibration
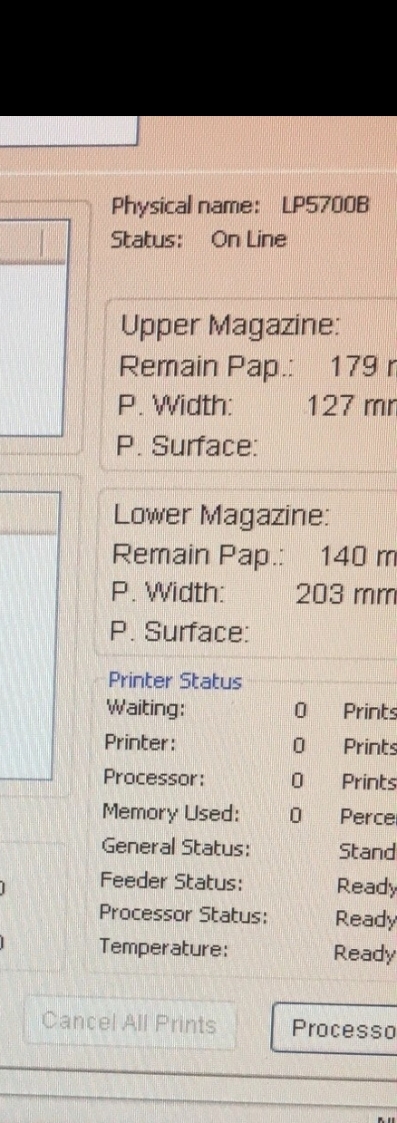
It is incredibly important I calibrate the wet lab printer often. This is due to the printer temperature change affecting the colours produced onto the light sensitive paper. When the machine is first turned on at 8:30 in the morning, it normally on average takes till 11:30 for the temperature to increase to where it should be which is best for calibration and printing. I am able to print before 11:30 if I make sure I calibrate after every print so the temperature doesn’t increase over time and the colour is shifted. It is important I have the 2 default sized papers in the printer to do it’s first calibration of the day. For our machine we have set the default size to upper 5″ and lower 8″.
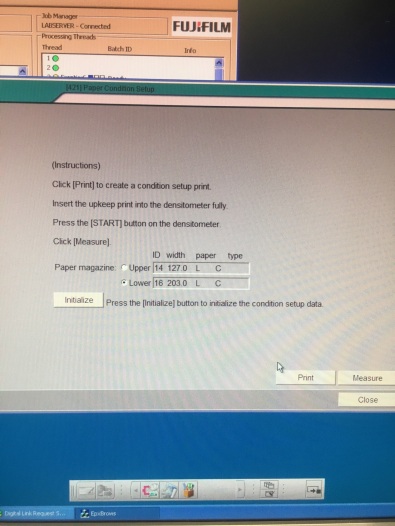
I have taken step by step images of how I calibrate the wet lab printer. First I click Maintenance, then I print either upper or lower cassette, then place the printed calibration sheet into the printer (third image). I then click measure which will give a result to say the printer is calibrated or not. If not, I then print again.

Monitor Calibration
Measuring the colour being displayed. I use an X-Rite i1 Display Pro, which is a professional standard display calibration tool. It is important my monitor is calibrated correctly as I edit the majority of the work that comes in from the photographers. If my screen isn’t calibrated correctly it affects the colour of the images that come out when printed. It is very important to calibrate due to working with skin tones and white shirts most the time. We don’t want students skin tone printing out too pink or too blue, likewise with the clothing colour. It is common that most monitors are set too bright, whereas mine is set correctly by the display pro.


At the end of the calibration, it gives you the option to see before and after. I like to see the difference in colour shift to see if I need to do it more often.
Bibliography
3.6 Set up the output device to print

To print my proof cards, comp copies or orders, I make sure all my images are saved as JPEG files. I use a programme named fiery to print on the Ricoh printer. I only print from my computer if it’s a spreadsheet created in Excel for orders. I then use the wet lab computer to print on that printer. When creating CAP shots, which are activity shots of the students, I save the contact sheet as a PDF file and print onto the Ricoh printer using fiery. We use fiery to print because it allows us to make and select our own inside page for all the different proofs. For example, an Individual proof has all the pack options on the inside, whereas for MPG- SS-2 proofs we only have 4 pack options which are set as a different inside page.
3.7 Check that the output device is loaded with sufficient output material and ready to receive the image file
To print my proofs, I need to make sure the Ricoh printer is fully switched on, meaning the fiery machine and the printer itself is on, and loaded with paper. I have to make sure I place the PDF files of the proofs onto the ‘held’ tab on fiery and then right click and select my workflow (the inside page and how it prints).
4 Be able to produce different forms of image output to meet requirements
4.1 Produce any required image proofs

We send over via email, the final product for the school to double check spellings and that they’re happy with the product before they get made into proofs and sent to the parents. Once we receive a reply confirming the go ahead, we then proceed to processing and printing. We always print out 10×8 comp copy tests before making the proofs, to show what the final product looks like, in order to check the colour. Our computer screens, although they’re calibrated as well as the printer, the colour we see on the screen comes out slightly different when printed. We do this to check the colour is good and we’re happy to proceed for printing proofs and when orders come back in. This also allows us to check the crop is correct and the images comes out with enough space around to fit in mounts.
4.2 Check the content and quality of image proofs against client requirements and workplace standards

Following above, most of our schools (especially new schools) request us to compare a print ready PDF copy to the proofs they received from printers. For me to complete this, I have to find the same print-ready PDF proofs, and print in-house. This allows me to check over any colour issues and double check little things such as crop, whitening and shadows. It is important to check the crop marks to make sure text or any part of the students in the images have been cut out the printed.
At Yep, I make sure once I have edited and produced the final outcomes, I print the comp copies. Each school we photograph who have MPG and Modern Square shots get complimentary copies of each class to place on their walls in reception. These go as 10×8’s through the wet lab printer. I print these before I go any further to double check the correct sizing, crop and colour. It is important to check these comp copies before making the proofs because the colour I see on my computer screen will never be the exact same colour when printed from the wet lab. This is always good to check them all against each other also. We have many schools that like their MPG shots taken outside, which means all the images will look slightly different from the amount of sun at each time a class is taken. This allows us to check they all look as similar as possible as we don’t want them all looking different for when the schools place them on display. Once I am pleased with the comp copies, I then go ahead and process and make the proofs.
It is important that what we send over for approval with a confirmation, is the same as when printed for all parents.
4.3 Explain the importance of image proofs signed off by all relevant parties

This sign-off stage is extremely vital and important because we need everyone to be happy with the final product. If schools/parents aren’t happy with the photos when they get delivered as proofs, the schools will complain meaning we could potentially lose them, or parents won’t buy the images meaning we lose a lot of money with sales decreasing. When orders come in, it is important we check everything again such as sizing for the different pack options as if anything is wrong, the cost builds up for re-prints meaning the company lose money.
It’s important that we provide image proofs to our clients/schools prior to the printing process, in order to give them a clear representation of how the colours will reproduce, the resolution and image quality at full size.
Once I have colour corrected the photos, I make sure Bryan checks my work before I export from Lightroom. In Lightroom we alter the white balance to ensure colours are correct for skin tones and uniform, as well as exposure, the black point, contrast, shadows and highlights. Once I have the go ahead to export, I then start either editing in photoshop for individuals, or producing the MPG and Square shots to make class images. Laura, the general manager, then checks my work for wording, spelling and head swaps. It is important in class photos we make sure we have the best image of each child, meaning we have to change heads from different images of the same class.
Once everything has been checked by Laura and Bryan, my job sheet for that school gets signed by them both to confirm it is ready to be sent. This is a good way to ensure everything is of high quality and anything we can’t change we make note of ready for any phone calls that come in from the school or parents. This lets reception know we had an issue.
4.4 Take appropriate action to resolve any problems with image proofs following discussions with all relevant parties

Whilst going through the stages of Bryan and Laura checking my work, if they’re not happy with anything or they want anything adjusted, I need to show the before and after. This helps them decide if they’re happy with the adjustment. Once Laura has checked my work for head swaps, she comes down with a notepad of all the classes and head swaps she wants to know if I’m able to swap. We go through the work together to discuss if they’re possible or not and then go from there. Once I have completed the head swaps and changes she wishes, my work is double checked again with the changes and then signed off for me to process when confirmed.
When making Modern square shots, sometimes the clusters are too tall or wide meaning the wording doesn’t always fit perfectly. This issue is resolved when moving out the clusters, creating more white space but having clear text.
We had an issue with the crop sizes when printing on the wet lab, which was cropping off some of the image we sent through. We resolved this by selecting a ‘fit in’ option on the printer meaning nothing got cut off the edges.
4.5 Select the appropriate computer from which to produce the final output
At Yep, we use Microsoft computers with Adobe Creative Suite software package installed on (in the lab), in order for us to edit all images. It is important I create everything on these computers, especially when they’ve been calibrated as other computers in the office aren’t calibrated due to not using them for editing. I create all my work on the same computer and process on my other. It is important for me to use the same computer when creating squares as I need to use the correct font and size for the text. Although we save all work on multiple networks and hard drives, we work on our desktops before copying the final outcomes onto the networks. This means I have all the work I need for each job on my own computer desktop, only being able to use other computers in the lab if I copy all the work onto the network which is accessible by all computers.
4.6 Send the image data file to the selected output device to produce the required image output, ensuring that manufacturer’s instructions are followed
 When the work is ready to print proofs, we use the Ricoh machine which is connected to a fiery machine, with a programme on the computers. I drag all my PDF files onto the ‘held’ tab on fiery on my processing computer. I then apply the suitable workflow and print. The fiery machine connected to the printer receives the data and prints. When orders come in, we use the wet lab to print on. We have shortcuts on every lab computer called ‘orders to be printed’. This is the folder we place all orders to be printed. All work gets organised into multiple folders in that shortcut folder with school numbers so everything is kept clear and safe. Once that school has been printed, we drag the folder into a separate folder inside ‘orders to be printed’ called ‘completed’. This keeps the folder organised and clear for the wet lab printer. Once all work is ready to print in the folder, we make sure the wet lab printer is calibrated and then find the folder on the wet lab printer computer screen. We have to make sure when printing the memory does not get too full as this can cause the printer to overwork and fail.

4.7 Produce the final output within workplace wastage limits
If I am not 100% happy with the images I have created, I will always print out 1 copy before printing the whole job. To make sure I am happy to proceed, as well as checking with the general manager. This ensures if something is incorrect or can be fixed, I’m not wasting thousands of prints. When using the normal Samsung printer at reception for spreadsheets, I make sure I select print preview before printing to ensure I’m not wasting loads of paper by selecting a wrong size.
4.8 Check the content and quality of final output against client requirements and workplace standards
At Yep, working alongside my general manager, we both check every job is suitable for print, following our high standards. It’s crucial to check the colour once printed and represented correctly with the correct colour mode. It’s important the image quality is correctly set (240dpi for individuals, 300dpi), and that the crop is correct when printed leaving enough space to go in mounts or frames. Keeping within the guidelines on Photoshop when creating the work, makes the amount of work to do after to check sizing and crops is minimal.
4.9 Forward acceptable output for delivery, collection or further production as required
When I have created the final work, I will forwards these JPEG images as small file sizes to the general manager who will then forward them in an email to the schools for confirmation. When shooting activity shoots, the school get the chance to choose 30 images they like, for me to then edit and send over on a CD. To send all the images taken, I create contact sheets on Lightroom, then in Photoshop create a PDF presentation with the contact sheets to make a booklet. This is a PDF booklet which can be sent over via email also.
4.10 Maintain the confidentiality of client material in line with workplace procedures

Maintaining confidentiality only applies to us if we are outsourcing work, however this doesn’t directly apply to us at Yep. As a school photography company, we mainly just shoot images of the children/students/staff. These images get sent off to the school/parents. When creating memoir packs, we take our own pictures of the outside of the school. If we were to want to use other peoples images instead of our own, we would need to get permission to do this, and it would be under their rules how we could use or edit their work.
4.11 Record all data relating to the content of the output in line with business/organisation requirements

At Yep, we always keep track of emails between each other, and the managers with schools. All images are kept on networks and hard drives, so that everyone in the company have access to them, for example when parents ring up about not receiving their proof/print or wanting to order via phone. All images are saved as JPEG files so everyone can view them on their own computers, not just in the lab. We also have our own programme designed for our needs which all data and images get stored on for up to date information as well as ordering/payment information.
5 Understand legislation, ethics and business requirements relevant to the preparation of image output
5.1 Identify key aspects of legislation relevant to the preparation of image output
![]()
When images are created such as logos for companies or brands, the producers/makers often build requirements that people who use the image have to meet. Meeting guidelines such as amount of bleed, crop marks, dpi levels and colour profile are important in order for the images to be of a high quality and what is expected form the schools. This is incredibly important when outsourcing work to print companies as they set a brief and if it’s not followed and things are incorrect it can waste their business time, money and product wastage. This is just as important when printing on our printers as the wet lab is very expensive to use the light sensitive paper, so wastage needs to be kept to a minimum.
5.2 Take appropriate action to minimise potential risks and hazards
It’s always best to use your own original images other than someone else’s, especially in the creative industry. It is important to not use other peoples images as you business could be at risk of breaching intellectual property rights if another persons image is used without their permission.
At Yep, being a photography company, we always use out own images taken by our photographers, therefore we don’t come into an risks relating to copyright. When creating brochures or anything related to the company, our graphic designer will always use images take by our photographers for the company, and it not he produces his own imagery.
All our work is checked by 2 people to agree for it to be printed and packed, and by Anna who packs the items. This minimises any potential risks of the work going out incorrect, which is incredibly important if a child has child protection meaning they’re only in images that will be sent to them separate to all the other children who get another copy.
5.3 Identify aspects of codes of ethics/conduct relevant to image output
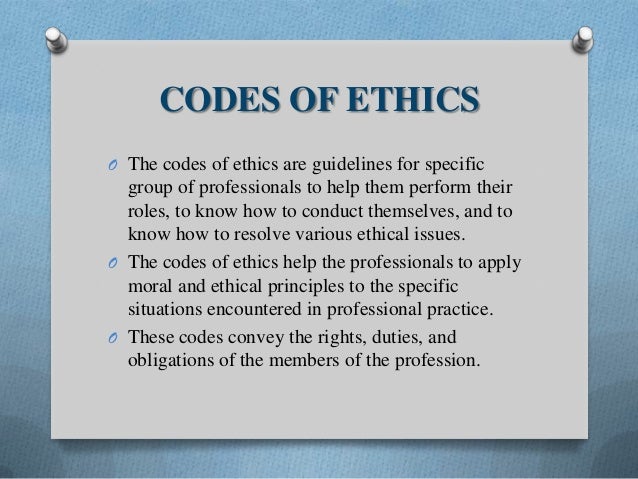
To abide by these ethical codes, it is important to not produce any inappropriate, offensive or illegal imagery, which we do not so at Yep. This doesn’t directly relate to our company, but if anything is requested by schools, it is informed to them by the manager it’s against our company policies. It’s vital that our company only use our own imagery, which avoids copyright infringement issues.
5.4 Comply with all business/ organisation systems and procedures

We stick with the same suppliers when restocking any frames, mounts and other equipment. This means we’re a loyal customer and will be more likely to benefit from deals and discounts.
We don’t use other companies to print our work from as we print thousands of images a day, which we use our Ricoh printer and wet lab for. These machines need to be maintained, cleaned and serviced meaning we have to stick with the same people each time who know how to use our machines.
